


2.03 Lucky Me - Mini Format How To
+8
rukristin
awjmgmom
Pooky
monica
Mara
Kaymcee
Tamara
jessicabree
12 posters
Page 1 of 1

2.03 Lucky Me - Mini Format How To
![]() by jessicabree Tue Feb 01, 2011 11:50 pm
by jessicabree Tue Feb 01, 2011 11:50 pm
I wanted to share a quick how to on the format for those that WANT to follow it... remember you can do any format you wish. Even if you are not doing this class, you might want to try this format for something else. It really a favorite of mine now after doing this project.
I came with this format based on a few desires:
Now how to create yours
Supplies needed:
* 12x12 sheets of cardstock all in one color or in mixed colors
Note: each sheet creates 3 "pages" (6 sides). For my 30 page album I used 5 sheets to create my interior pages.
* Chipboard, acrylic, or heavy duty cardstock you can cut to create your covers
* Patterned paper scraps, at least 3.5" wide by 4" tall
* Bone folder or old credit card
* Ruler or scoring tool
* 4x6 photos - 1 per page/topic (I chose to use a smaller photo on one page, and no photo on two pages)
* Liquid glue or ATG gun (you want a firm bond)
* Embellishments and small alphas (I recommend going very FLAT if you are doing 20+ topics in your book or it might get really bulky)
Step 1: Choose your card stock and papers
I chose to work with 12" by 3.5" strips of patterned paper for the most part. You can do a more unified look and focus on just 1-3 colors like Mara did, or be a bit more bold and really mix it up like it did
My cardstocks

My patterned papers

Step 2: Make the card stock base for your pages
Cut each piece of card stock into 12" wide by 4" tall strips. You will get 3 strips per 12" by 12" sheet. Then score each sheet 3" over from the side.

Step 3: Make your flaps
Fold each page where you scored it to make the flap. You'll notice you only have flaps on one side of each page, so to create the flap on the other side, we are going to use patterned paper piece.
Cut out 3.5" wide by 4" tall pieces of patterned paper. Score each piece 0.5" over from the side.

Glue or adhere the 0.5" flap down to the edge of your page so that you now have flaps on every page... on one side it is a card stock flap you made when you folded the strip of card stock and on the other side its a flap made from gluing down a piece of patterned paper.


Step 4: Organize your pages
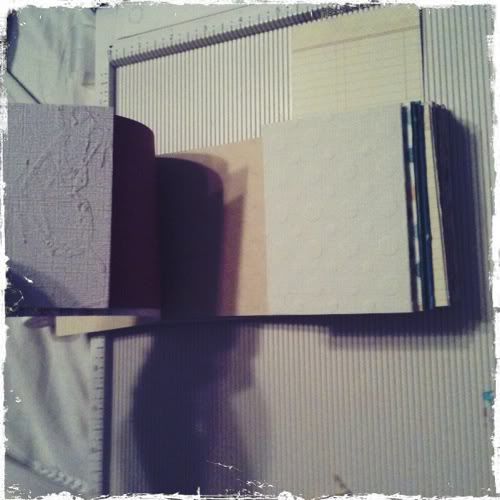
Now you book should look something like this

I chose to line up my pages so that I had card stock flaps together in facing pages, then patterned paper flaps together in facing pages, and so on. Its really up to you and this is not a big deal, but I recommend laying out your pages in an order you find pleasing. You can follow a set pattern or make it totally random.
Facing pages, both patterned paper flaps

Facing pages, both card stock flaps
Step 5: Add Photos and Titles
Now you can add your photos. Adhere photos down along the edge that does not have the flap. This is the inside edge of your book. Keep in mind you will be punching thru this edge about 0.5" in to bind it later (or gluing along the edge if you choose to accordion fold bind) so you don't want ANYTHING important along the edge of the photo.
After your photos add your titles, and embellies. Again, I suggest keeping it somewhat flat.

Step 6: Add Journaling
Last, add your journaling under the flaps. You can either handwrite your journaling like me or try typing up and printing out your journaling like Mara
Step 7: Cover and Bind
Bind your album however you wish. I chose to hole punch mine but this made it a lot fatter on the edges than the spine. If you want a more even book, consider using the accordion fold binding like Mara did. You can see how to here: https://www.youtube.com/watch?v=IPNWJKrwO5w
Last - share your book with us so we can ooh and ah over it AND you can earn a badge and a chance at fabulous kit!
A few photos of the format I used for my book to help you visualize the final project:
Front View

Top View

Side View

Open Book


I came with this format based on a few desires:
- First, I hate wasted cardstock. The base of these pages are 12x12 sheets of cardstock with zero "waste"!
- Second, this format lets you keep the pages a bit cleaner and "hide" your journaling. This can be great for two reason: one, you might not want to show your journaling for each item to the world and second, it gives you extra room to journal without cluttering your design
- Last, I love the look of the edge to edge photos with the block for the title.
Now how to create yours
Supplies needed:
* 12x12 sheets of cardstock all in one color or in mixed colors
Note: each sheet creates 3 "pages" (6 sides). For my 30 page album I used 5 sheets to create my interior pages.
* Chipboard, acrylic, or heavy duty cardstock you can cut to create your covers
* Patterned paper scraps, at least 3.5" wide by 4" tall
* Bone folder or old credit card
* Ruler or scoring tool
* 4x6 photos - 1 per page/topic (I chose to use a smaller photo on one page, and no photo on two pages)
* Liquid glue or ATG gun (you want a firm bond)
* Embellishments and small alphas (I recommend going very FLAT if you are doing 20+ topics in your book or it might get really bulky)
Step 1: Choose your card stock and papers
I chose to work with 12" by 3.5" strips of patterned paper for the most part. You can do a more unified look and focus on just 1-3 colors like Mara did, or be a bit more bold and really mix it up like it did
My cardstocks
My patterned papers
Step 2: Make the card stock base for your pages
Cut each piece of card stock into 12" wide by 4" tall strips. You will get 3 strips per 12" by 12" sheet. Then score each sheet 3" over from the side.
Step 3: Make your flaps
Fold each page where you scored it to make the flap. You'll notice you only have flaps on one side of each page, so to create the flap on the other side, we are going to use patterned paper piece.
Cut out 3.5" wide by 4" tall pieces of patterned paper. Score each piece 0.5" over from the side.
Glue or adhere the 0.5" flap down to the edge of your page so that you now have flaps on every page... on one side it is a card stock flap you made when you folded the strip of card stock and on the other side its a flap made from gluing down a piece of patterned paper.
Step 4: Organize your pages
Now you book should look something like this
I chose to line up my pages so that I had card stock flaps together in facing pages, then patterned paper flaps together in facing pages, and so on. Its really up to you and this is not a big deal, but I recommend laying out your pages in an order you find pleasing. You can follow a set pattern or make it totally random.
Facing pages, both patterned paper flaps
Facing pages, both card stock flaps
Step 5: Add Photos and Titles
Now you can add your photos. Adhere photos down along the edge that does not have the flap. This is the inside edge of your book. Keep in mind you will be punching thru this edge about 0.5" in to bind it later (or gluing along the edge if you choose to accordion fold bind) so you don't want ANYTHING important along the edge of the photo.
After your photos add your titles, and embellies. Again, I suggest keeping it somewhat flat.
Step 6: Add Journaling
Last, add your journaling under the flaps. You can either handwrite your journaling like me or try typing up and printing out your journaling like Mara
Step 7: Cover and Bind
Bind your album however you wish. I chose to hole punch mine but this made it a lot fatter on the edges than the spine. If you want a more even book, consider using the accordion fold binding like Mara did. You can see how to here: https://www.youtube.com/watch?v=IPNWJKrwO5w
Last - share your book with us so we can ooh and ah over it AND you can earn a badge and a chance at fabulous kit!
A few photos of the format I used for my book to help you visualize the final project:
Front View
Top View
Side View
Open Book

jessicabree- Admin
- Posts : 3286
Join date : 2010-12-02
Age : 51
Location : Suburbs of Atlanta -

Re: 2.03 Lucky Me - Mini Format How To
![]() by jessicabree Thu Feb 03, 2011 8:41 am
by jessicabree Thu Feb 03, 2011 8:41 am
Hopefully all of this makes sense!
jessicabree- Admin
- Posts : 3286
Join date : 2010-12-02
Age : 51
Location : Suburbs of Atlanta -
Re: 2.03 Lucky Me - Mini Format How To
![]() by Tamara Thu Feb 03, 2011 8:53 am
by Tamara Thu Feb 03, 2011 8:53 am
I love this. thanks for posting it. When I do this class, I am going to use this. 

Tamara- Posts : 528
Join date : 2010-12-09
Re: 2.03 Lucky Me - Mini Format How To
![]() by Kaymcee Thu Feb 03, 2011 10:59 am
by Kaymcee Thu Feb 03, 2011 10:59 am
Thanks for posting this! The measurements are helpful!

Kaymcee- Posts : 310
Join date : 2010-12-27
Age : 52
Location : Chicago-Western Burbs -
Re: 2.03 Lucky Me - Mini Format How To
![]() by Mara Thu Feb 03, 2011 12:03 pm
by Mara Thu Feb 03, 2011 12:03 pm
I  this format. I so want to do another mini using this! Maybe a gift for my mom!
this format. I so want to do another mini using this! Maybe a gift for my mom!
Mara- Admin
- Posts : 2059
Join date : 2010-12-02
Age : 51
Location : Atlanta burbs -
Re: 2.03 Lucky Me - Mini Format How To
![]() by monica Thu Feb 03, 2011 7:20 pm
by monica Thu Feb 03, 2011 7:20 pm
Great tutorial...thank you!

monica- Posts : 561
Join date : 2010-12-08
Location : Colorado -
Re: 2.03 Lucky Me - Mini Format How To
![]() by Pooky Fri Feb 04, 2011 5:13 pm
by Pooky Fri Feb 04, 2011 5:13 pm
oooh, love this format too
thanks for the as-you-go photos lol
thanks for the as-you-go photos lol

Pooky- Posts : 964
Join date : 2010-12-09
Age : 54
Location : Boonville, IN (yes, really) -
Re: 2.03 Lucky Me - Mini Format How To
![]() by awjmgmom Fri Feb 04, 2011 5:19 pm
by awjmgmom Fri Feb 04, 2011 5:19 pm
I'll need to print and digest this, but this looks AWESOME! THANKS!

awjmgmom- Posts : 7
Join date : 2011-01-28
Re: 2.03 Lucky Me - Mini Format How To
![]() by rukristin Fri Feb 04, 2011 5:33 pm
by rukristin Fri Feb 04, 2011 5:33 pm
Love this format Breezer!

rukristin- Posts : 2272
Join date : 2010-12-05
Age : 38
Location : Central NJ -
Re: 2.03 Lucky Me - Mini Format How To
![]() by jessicabree Fri Feb 04, 2011 5:58 pm
by jessicabree Fri Feb 04, 2011 5:58 pm
Pooky wrote:oooh, love this format too
thanks for the as-you-go photos lol
I know... I used my iPhone so it looks kind of crazy!

jessicabree- Admin
- Posts : 3286
Join date : 2010-12-02
Age : 51
Location : Suburbs of Atlanta -
Re: 2.03 Lucky Me - Mini Format How To
![]() by cherB Fri Feb 04, 2011 7:41 pm
by cherB Fri Feb 04, 2011 7:41 pm
I love the flaps and using the whole paper. Your instructions are really great and will be very helpful.
Oh, my head is starting to whirl with ideas.
Oh, my head is starting to whirl with ideas.

cherB- Posts : 69
Join date : 2011-01-05
Age : 55
Location : East Coast Florida -
Re: 2.03 Lucky Me - Mini Format How To
![]() by asarasota Sat Feb 05, 2011 1:49 pm
by asarasota Sat Feb 05, 2011 1:49 pm
this is really helpful... I got confused about how the flap goes on, and could come back and look to see... wonderful!
I'm having trouble punching the edge of the cardstock layered with the pp though... I think I need a better punching tool. Otherwise I can't get my rings through.
I'm having trouble punching the edge of the cardstock layered with the pp though... I think I need a better punching tool. Otherwise I can't get my rings through.
asarasota- Posts : 1606
Join date : 2010-12-09
Location : Do Be a Do Bee
Re: 2.03 Lucky Me - Mini Format How To
![]() by jessicabree Sat Feb 05, 2011 1:52 pm
by jessicabree Sat Feb 05, 2011 1:52 pm
Oh no A. I used my crop a dile so I didn't even think about it.
jessicabree- Admin
- Posts : 3286
Join date : 2010-12-02
Age : 51
Location : Suburbs of Atlanta -
Re: 2.03 Lucky Me - Mini Format How To
![]() by ScrapHappy Mon Feb 07, 2011 11:56 am
by ScrapHappy Mon Feb 07, 2011 11:56 am
Love this....the breakdown makes it a breeze! Just thought of what I will use this for....my DD is turning 13 in May. I am going to get the album done and then add pics from her party to the album and give it to her before the night is over. How cool would that be? 

ScrapHappy- Posts : 231
Join date : 2010-12-31
Re: 2.03 Lucky Me - Mini Format How To
![]() by Mara Mon Feb 07, 2011 12:04 pm
by Mara Mon Feb 07, 2011 12:04 pm
ScrapHappy wrote:Love this....the breakdown makes it a breeze! Just thought of what I will use this for....my DD is turning 13 in May. I am going to get the album done and then add pics from her party to the album and give it to her before the night is over. How cool would that be?
that's a fantastic idea! And because of the awesome format Bree designed it is soo easy to put together!
Mara- Admin
- Posts : 2059
Join date : 2010-12-02
Age : 51
Location : Atlanta burbs -
Re: 2.03 Lucky Me - Mini Format How To
![]() by bwilbanks Wed Feb 09, 2011 11:48 am
by bwilbanks Wed Feb 09, 2011 11:48 am
So this is the project that you were working on at Archiver's. I love it and can't wait to start one. Your directions are terrific and so easy to follow.

bwilbanks- Posts : 2
Join date : 2010-12-18
Age : 74
Location : Lawrenceville, GA
Re: 2.03 Lucky Me - Mini Format How To
![]() by Mara Wed Feb 09, 2011 11:52 am
by Mara Wed Feb 09, 2011 11:52 am
bwilbanks wrote:So this is the project that you were working on at Archiver's. I love it and can't wait to start one. Your directions are terrific and so easy to follow.
Yep this is the one you saw! I can't wait to see what you come up with!
Mara- Admin
- Posts : 2059
Join date : 2010-12-02
Age : 51
Location : Atlanta burbs -
» 2.01 Lucky Me - Show off your work!
» 2.01 Lucky Me - Bree's Album
» Lucky Me... Extention
» Anyone planning on doing Lucky Me?
» 2.01 Lucky Me - Chat Thread
» 2.01 Lucky Me - Bree's Album
» Lucky Me... Extention
» Anyone planning on doing Lucky Me?
» 2.01 Lucky Me - Chat Thread
Page 1 of 1
Permissions in this forum:
You cannot reply to topics in this forum|
|
|