


My set up for indoor projects photos
+3
HappyStamper
miraq
jessicabree
7 posters
Page 1 of 1

My set up for indoor projects photos
![]() by jessicabree Sat Dec 04, 2010 11:07 pm
by jessicabree Sat Dec 04, 2010 11:07 pm
So you can buy these cool kits to take photos of small items indoors, like for ebay or similar. But they can be a bit pricey. So I made up my own little system.
You need Ott light/craft light to get good lighting and color. I bought the knock off brand of light at J's on sale.

Then I put a foam core board for my back drop. I did a bad job cutting the sides so they are uneven! lol Scoring and folding the board will give you little "wings" on the side so you can do shots from the side of your project if you want.
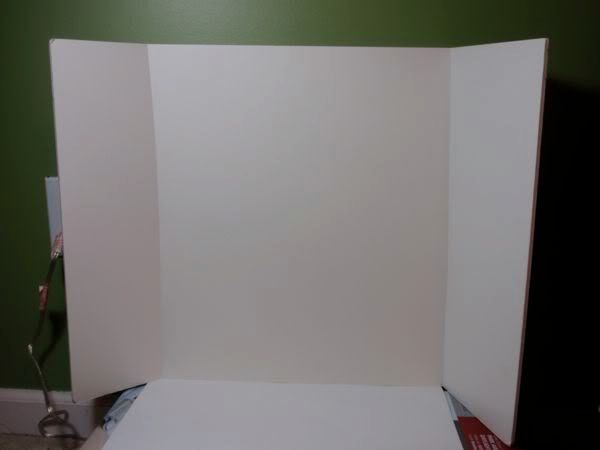
I had a box (the one my lamp came in) underneath as my work surface. I chose to use a piece of white foam (that stuff for kids, in the kid section at J's or M's) to cover the box because it won't get wrinkled so it holds up better to wear and tear.

So a bad shot of the whole thing:

Works great for small projects (obviously I would get in closer for the real project shot, just showing how it looks from a distance)

And I tried an easel for pages but realized I don't need it. I lean the page against the back for the normal shots:

And for macro detail shots, I lay it down

the only thing to decide is where to put the light and what angle you want it to hit the project.
Light placed in front of the project:

Above project:

On the side:

You need Ott light/craft light to get good lighting and color. I bought the knock off brand of light at J's on sale.
Then I put a foam core board for my back drop. I did a bad job cutting the sides so they are uneven! lol Scoring and folding the board will give you little "wings" on the side so you can do shots from the side of your project if you want.
I had a box (the one my lamp came in) underneath as my work surface. I chose to use a piece of white foam (that stuff for kids, in the kid section at J's or M's) to cover the box because it won't get wrinkled so it holds up better to wear and tear.
So a bad shot of the whole thing:
Works great for small projects (obviously I would get in closer for the real project shot, just showing how it looks from a distance)
And I tried an easel for pages but realized I don't need it. I lean the page against the back for the normal shots:
And for macro detail shots, I lay it down
the only thing to decide is where to put the light and what angle you want it to hit the project.
Light placed in front of the project:
Above project:
On the side:

jessicabree- Admin
- Posts : 3286
Join date : 2010-12-02
Age : 51
Location : Suburbs of Atlanta -

Re: My set up for indoor projects photos
![]() by miraq Mon Dec 13, 2010 1:38 pm
by miraq Mon Dec 13, 2010 1:38 pm
You're my queen of the tips!

miraq- Posts : 237
Join date : 2010-12-13
Age : 36
Location : Wroclaw -
Re: My set up for indoor projects photos
![]() by HappyStamper Mon Dec 13, 2010 4:06 pm
by HappyStamper Mon Dec 13, 2010 4:06 pm
Hey Bree-
I use two lights, one to each side, to eliminate shadows.
I use two lights, one to each side, to eliminate shadows.

HappyStamper- Posts : 824
Join date : 2010-12-03
Age : 62
Location : Grand Rapids, Michigan

Shannon- Posts : 142
Join date : 2010-12-10
Age : 47
Location : Rochester Hills, MI
Re: My set up for indoor projects photos
![]() by blondscrapper Mon Dec 13, 2010 9:22 pm
by blondscrapper Mon Dec 13, 2010 9:22 pm
thanks for the tips
right now I scan everything, but hopefully I'll be brave enough to try this soon
right now I scan everything, but hopefully I'll be brave enough to try this soon
Last edited by blondscrapper on Mon Dec 13, 2010 9:25 pm; edited 1 time in total (Reason for editing : misspell)

blondscrapper- Posts : 49
Join date : 2010-12-09
Age : 60
Location : Western Wisconsin -
Re: My set up for indoor projects photos
![]() by rukristin Mon Dec 13, 2010 10:42 pm
by rukristin Mon Dec 13, 2010 10:42 pm
I keep forgetting to pick up the foamboard when i'm at the art store

rukristin- Posts : 2272
Join date : 2010-12-05
Age : 38
Location : Central NJ -
Re: My set up for indoor projects photos
![]() by jessicabree Mon Dec 13, 2010 10:43 pm
by jessicabree Mon Dec 13, 2010 10:43 pm
I need a new one... my old one has gotten beat up since I have had it for over a year.
jessicabree- Admin
- Posts : 3286
Join date : 2010-12-02
Age : 51
Location : Suburbs of Atlanta -
Re: My set up for indoor projects photos
![]() by ceekay Sun Dec 19, 2010 7:12 pm
by ceekay Sun Dec 19, 2010 7:12 pm
thanks for posting this Bree, I need to make a photo box!

ceekay- Posts : 353
Join date : 2010-12-08
Age : 82
Location : Chicago suburb
Re: My set up for indoor projects photos
![]() by jessicabree Sun Dec 19, 2010 8:09 pm
by jessicabree Sun Dec 19, 2010 8:09 pm
You're welcome! I love my set up. It has made my life SO much easier. I no longer have to wait for sunlight.
jessicabree- Admin
- Posts : 3286
Join date : 2010-12-02
Age : 51
Location : Suburbs of Atlanta -
Page 1 of 1
Permissions in this forum:
You cannot reply to topics in this forum|
|
|